- You are here:
- Home »
- Blog »
- Power BI »
- Monitoring Power BI Workspaces Using the Admin Portal and PowerShell

Monitoring Power BI Workspaces Using the Admin Portal and PowerShell
G Com Solutions supply Power BI Training in London and throughout the UK.
Workspaces play a pivotal role in Power BI collaboration and sharing workflows. The ability to create app workspaces is controlled in the tenant settings: Admin Portal > Tenant Settings > Workspace Settings. This ability can be enabled/disabled for The entire organization, or for specific security groups. Workspaces are currently the only repository for Power BI content and they have a single-level structure; in other words, you cannot group workspaces or create workspaces within other workspaces. This means that workspace design, planning and management is a key task for all Power BI admins.
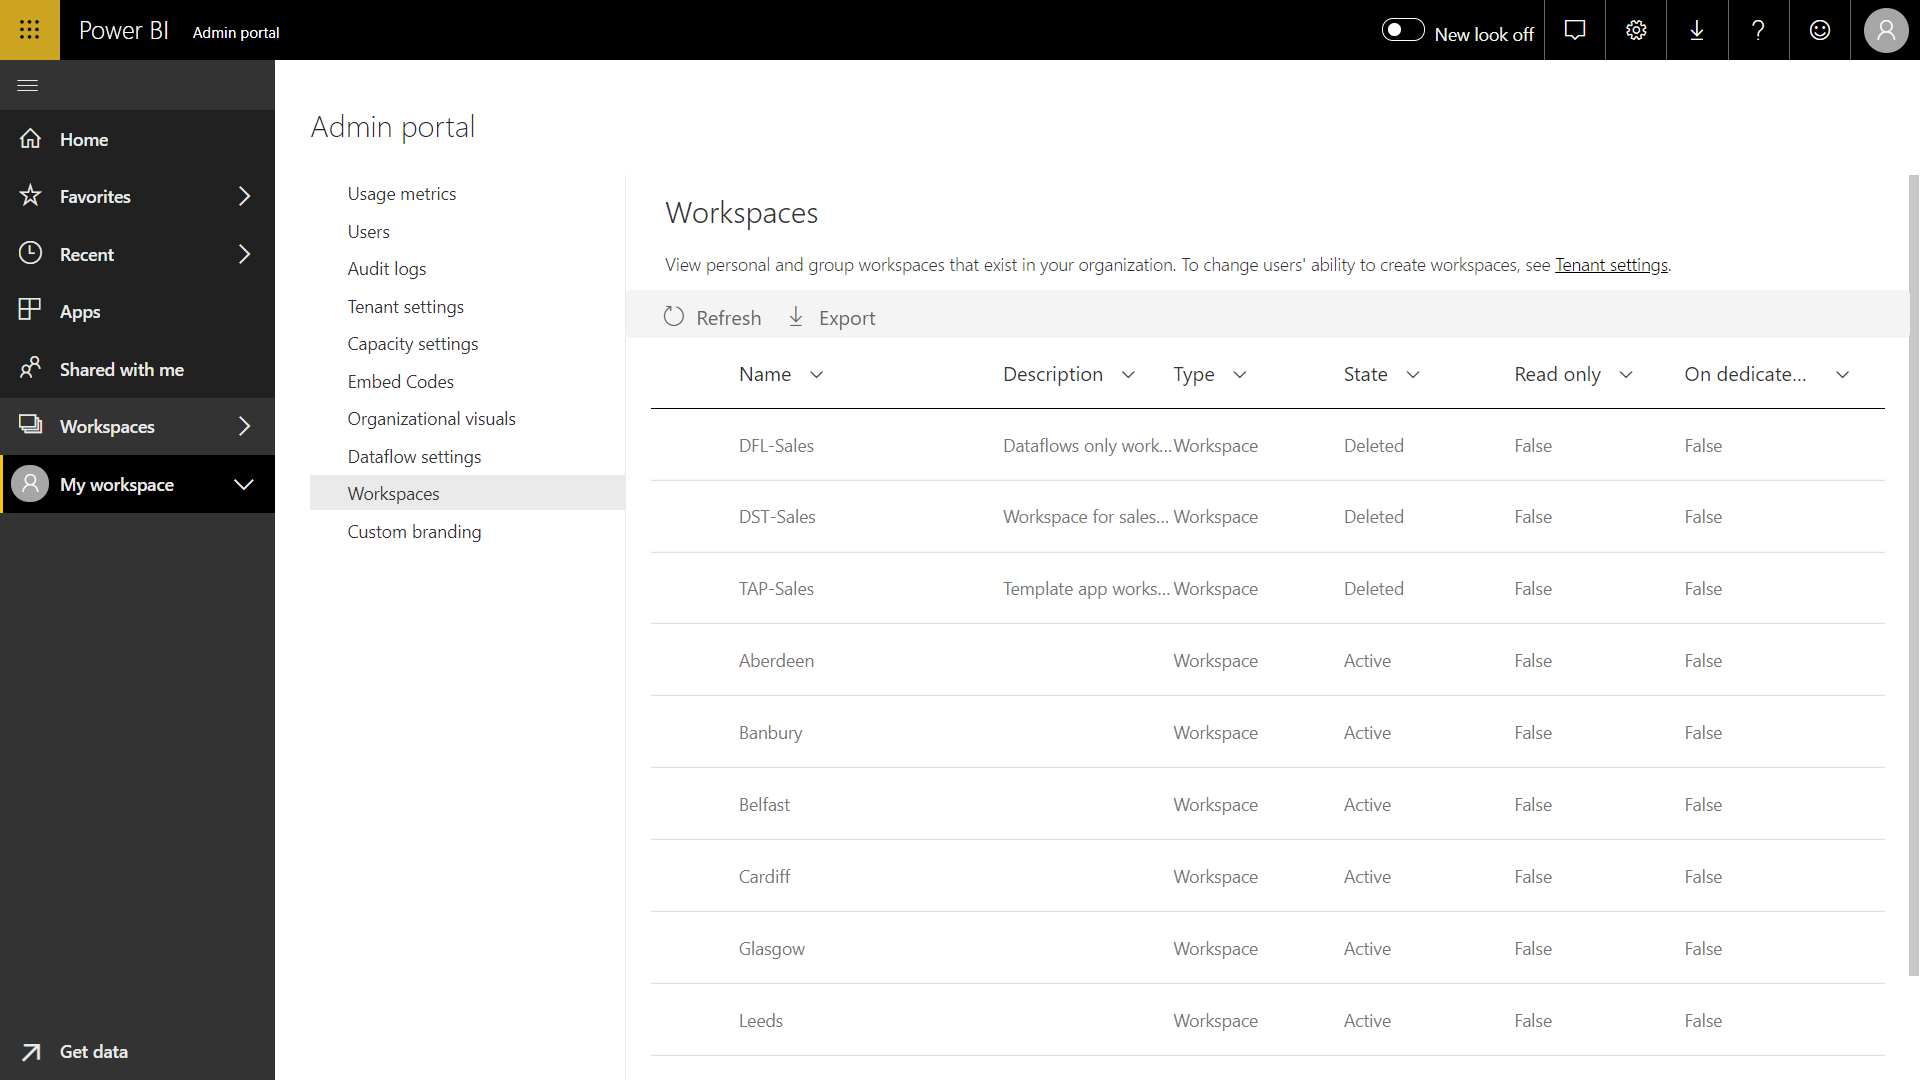
The Workspaces page in the Power BI Admin Portal lists all of the workspaces in a Power BI tenant and the key workspace properties.

The page allows you to apply text filters on any of the columns, making it easy to identify workspaces which match certain criteria. The key columns are shown below.
- Name: The name given to the workspace by its creator.
- Description: The optional metadata entered in the Description box.
- Type: An enumeration which specifies the kind of workspace: PersonalGroup (a.ka. My Workspace), Group (legacy), Workspace (new).
- State: An enumeration which specifies whether the workspace is still active: Active, Deleted, Removing, Orphaned.
- Read only: This Boolean option is only available with legacy workspaces and is false for all new workspaces.
- On dedicated capacity: This property is true if a purchased dedicated capacity (such as Power BI Premium or Embedded) has been assigned to this workspace.
You can also export the list of workspaces as a CSV file.
Another way of accessing this information is to use PowerShell. This option provides a couple of additional workspace properties and has the benefit that you can run a PowerShell script on a schedule, whereas you have to manually download the equivalent CSV from the Power BI admin portal page.
Power BI PowerShell modules
There are six Power BI PowerShell modules available for install and a rollup which installs them all in one operation.
- MicrosoftPowerBIMgmt (Rollup containing all separate modules)
- MicrosoftPowerBIMgmt.Admin
- MicrosoftPowerBIMgmt.Capacities
- MicrosoftPowerBIMgmt.Data
- MicrosoftPowerBIMgmt.Profile
- MicrosoftPowerBIMgmt.Reports
- MicrosoftPowerBIMgmt.Workspaces
To install all modules via the rollup, use the command:
Install-Module -Name MicrosoftPowerBIMgmt
Or install individual modules:
Install-Module -Name MicrosoftPowerBIMgmt.Workspaces
To get the most out of the available commands, you need to be either a global admin or a Power BI service admin. To begin a session, you first need to login:
Connect-PowerBIServiceAccount
And there are also a couple of aliases for this command:
Login-PowerBIService
Account
Login-PowerBI
Once logged in, you can use the get-PowerBIWorkspace command to retrieve a list. Thus, for example, the following command retrieves a list of all Power BI workspaces in the current tenant and exports the list to a CSV file.
Get-PowerBIWorkspace -Scope Organization -All | Export-Csv -path workspaces.csv
The exported CSV contains all of the columns available in the Power BI admin portal as well as two additional columns:
- ID: The unique identifier which is automatically assigned to the workspace when it is created.
- CapacityID: The unique identifier which is automatically assigned to the workspace when a dedicated capacity is assigned to it.
All workspaces have an ID; however, naturally, only workspaces to which a dedicated capacity has been assigned will have a capacity ID.
Having created a CSV file which contains up to date infomation about all the workspaces in your tenant, you can connect to it and build a report in Power BI. Thus, in the following example, we have created a report which shows the total number of workspaces, the number of modern workspaces, the number of old style workspaces and the number of workspaces which have become orphaned.

To calculate the number of workspaces, we simply count all rows in the table, excluding personal workspaces, orphaned workspaces and workspaces which have been deleted:
Total Workspaces =

CALCULATE ( COUNTROWS ( workspaces ) ,

workspaces[Type] <> "PersonalGroup",

workspaces[State] <> "Deleted",

workspaces[State] <> "Removing"

)
In a similar way, to calculate the number of modern workspaces, we proceed in the same way; but, additionally, we ensure that only workspaces with a Type of “Workspace” are counted:
Modern Workspaces =

CALCULATE ( COUNTROWS ( workspaces ) ,

workspaces[Type] = "Workspace",

workspaces[State] <> "Deleted",

workspaces[State] <> "Removing"

)
To calculate the number of “old skool” workspaces, we ensure that only workspaces with a Type of “Group” are counted:
Old Workspaces =

CALCULATE ( COUNTROWS(workspaces ),

workspaces[Type] = "Group",

workspaces[State] <> "Deleted",

workspaces[State] <> "Removing"

)
And, finally, to calculate the number of orphaned workspaces, we ensure that only workspaces with an IsOrphaned value of True are counted:
Orphaned =

CALCULATE ( COUNTROWS ( workspaces ) ,

workspaces[IsOrphaned] = True,

workspaces[State] <> "Deleted",

workspaces[State] <> "Removing"

)
