- You are here:
- Home »
- Blog »
- Power BI »
- Removing Unnecessary Rows in Power Query
Removing Unnecessary Rows in Power Query
One of the most common data cleansing operations performed in Power Query is the removal of unwanted rows. And this is a topic which we cover in almost all of our Power BI training courses. In this blog post, we will look at the key M function used to suppress unwanted rows.
Table.Skip
The first function we will examine is Table.Skip.
Syntax
Table.Skip(
table as table,
optional countOrCondition as any
) as table
- Table: The table to be transformed
- CountOrCondition: The number of rows to skip or the condition to be met for the rows to be skipped
The function is generated when you click Home > Reduce Rows > Remove Rows > Remove Top Rows. The Remove Top Rows dialog (shown below) allows you to enter the number of rows to be removed.

Power BI then creates a step called “Removed Top Rows” and, behind it, a line of code similar to the following:
#"Removed Top Rows" = Table.Skip(#"Changed Type",2)
(#”Changed Type” is a variable name containing a table reference.)
The M code implementation of Table.Skip created by the interface is fairly basic, in the context of removing rows, in that it provides no flexibility; the number of rows specified is always removed. However, if you are connecting to data which has an unknown number of metadata rows preceding the actual data, you can modify the M code, so that the second argument of Table.Skip is a Boolean test rather than a number.
Thus, for example, if we knew that the first column heading in our data is “Date”, we might say:
#"Removed Top Rows" = Table.Skip(#"Changed Type",each [Column1] <> "Date")
Since we have not got as far promoting headers, the first column will have the default heading “Column1”.
The each causes our Boolean test to be applied to each row of the table. Using this approach, it does not matter if we have one row of metadata to remove or 100 rows; all rows will be removed (starting from the top) until we find the row that contains the “Date” heading.
For removing rows from the bottom, M provides the Table.RemoveLastN function. The function is generated when you click Home > Reduce Rows > Remove Rows > Remove Bottom Rows. Once again, the interface forces you to specify the second parameter as a number; but you can edit the M code and replace the second argument with a Boolean statement if you wish.
Table.AlternateRows
The Table.AlternateRows function, which is generated by clicking Home > Reduce Rows > Remove Rows > Remove Alternate Rows, removes rows by following a specified pattern.
Syntax
Table.AlternateRows(
table as table,
offset as number,
skip as number,
take as number
) as table
- Table: The table to be transformed
- Offset: The number of the first row to be removed
- Skipped: The number of rows to be removed each time
- Take: The number of rows to be kept each time
For example, in the following table, we have daily sales figures, from Monday through to Friday, followed by a row showing the weekly total.
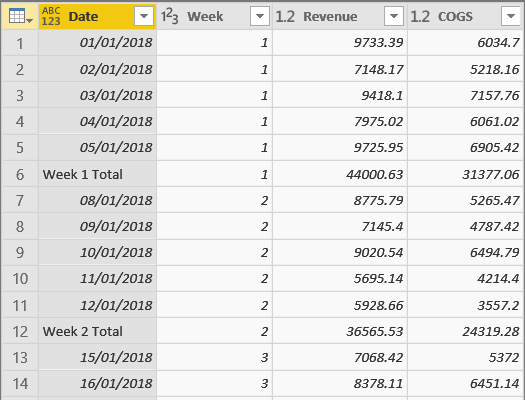
Clearly, for analysis purposes, we would need to suppress the week total rows. Since we have a consistent pattern of rows to be kept and to be removed (keep 5 rows, remove 1 row, keep 5 rows, remove 1 row…), we can use the Table.AlternateRows function to remove the unwanted rows.
Clicking Home > Reduce Rows > Remove Rows > Remove Alternate Rows displays the following dialog.
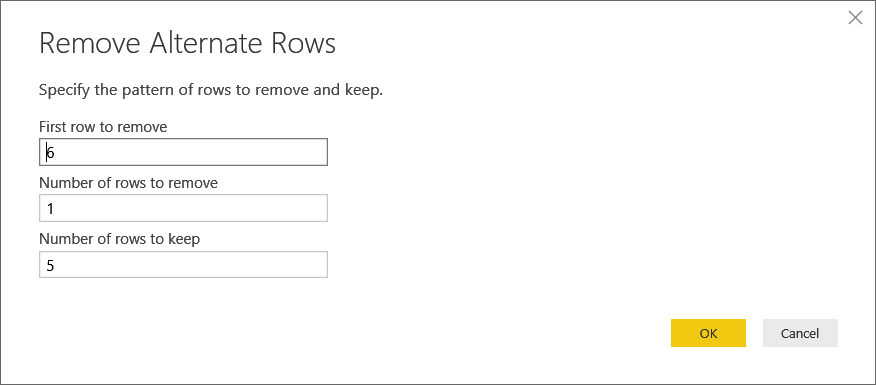
After completing the dialog, as shown above, we generate the following line of code.
#"Removed Alternate Rows" = Table.AlternateRows(#"Changed Type",5,1,5)
(#”Changed Type” is the name of the variable which references our table.) As you can see the three figures we enter in the Remove Alternate Rows dialog generate the arguments of the offset, skipped and take arguments of the Table.AlternateRows function. Note, however, that the dialog asks us to enter the First row to remove (an absolute value). This will always be one greater than the offset parameter of the Table.AlternateRows function (a relative value).
Table.RemoveRowsWithErrors
The Table. RemoveRowsWithErrors function, which is generated by clicking Home > Reduce Rows > Remove Rows > Remove Errors, removes all rows which contain an error value in any of the specified columns.
Syntax
Table.RemoveRowsWithErrors(
table as table,
optional columns as nullable list
) as table
- Table: The table to be transformed
- Column: An optional list of columns to be examined (If omitted, all columns are included)
In our weekly sales example, we could generate an error on each of the week total rows simply by changing the type of the Date column to Date, as shown below.
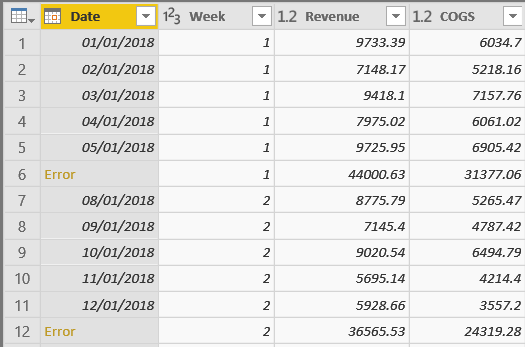
Clicking Home > Reduce Rows > Remove Rows > Remove Errors, with the Date column selected, would then remove all the error rows by creating a line of code like the one shown below.
#"Removed Errors" = Table.RemoveRowsWithErrors(
#"Changed Type",
{"Date"}
)
(#”Changed Type” is a variable containing a reference to our table.)
Note that, even though we are only examining one column, the column name still has to be placed inside a list; since the optional column parameter of the Table.RemoveRowsWithErrors function requires a list. Naturally, if we omit this argument altogether, we would still obtain the same result.
Table.RemoveMatchingRows
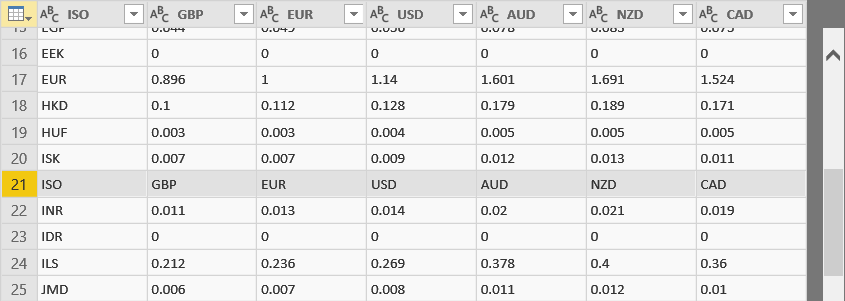
Repeating headers often result when you connect to data which is not raw data but, rather, data which has been formatted for output. An example of such data is shown below.

In this example, as we scroll down, we find that row 21 is a repetition of the header row; and, in this case, the pattern repeats.
There are a number of approaches which will be appropriate for different scenarios. We could, for example, filter out the unwanted header repetitions, using the function Table.SelectRows. In the example shown above, since the headers repeat every 21 rows, we could also use Table.AlternateRows.
There is, however, an “industrial strength” function which is ideal for removing only repeating headers, without the risk of accidentally eliminating perfectly sound data rows in the process: the name of the function is Table.RemoveMatchingRows.
The Table.RemoveMatchingRows function allows you to list as many match criteria as you wish, in a very compact format: Column1 = “Column1”, Column2 = “Column2”, and so forth.
Syntax
Table.RemoveMatchingRows(
table as table,
rows as list,
optional equationCriteria as any
) as table
- Table
The table from which you want to remove rows. - Columns
A list containing the criteria you wish to use in determining which rows to remove, using the format ColumnName = Value. - EquationCriteria
An optional value that specifies how to control comparison between the rows of the table.
Thus, in the illustration shown above, assuming a table variable called #”Removed Columns”, we would use syntax like the following to remove the repeating headers.
Output = Table.RemoveMatchingRows(
#"Removed Columns",
{[ISO="ISO",
GBP="GBP",
EUR="EUR",
USD="USD",
AUD="AUD",
NZD="NZD",
CAD="CAD"]}
)
The reassuring thing about this approach is that it allows you to test, if necessary, every single column in the table. In order to be removed, a row would have to satisfy all of the criteria listed in the square brackets. In other words, the ISO column would need to contain “ISO”, the GBP column, “GBP”, and so forth.
(Please note, however, that this function can only be entered manually in the M code and has no equivalent command in the Power Query Editors.)
Table.SelectRows
As well as these commands which relate specifically to the removal of rows, Power Query also provides the ability to filter out unwanted rows of data. Filtering in the Power Query Editor has one distinct advantage over filtering in DAX: any data which is excluded because of a Power Query filter operation will not be loaded into Power BI each time the dataset is refreshed.
The filtering interface is very reminiscent of Excel filtering and the options are very much the same. The same three mechanisms are present: check boxes, a search box and the Filters sub-menu which changes, depending on the data type of the column, to read: “Text Filters”, “Number Filters” or “Date Filters”.
The function which is generated by the various interface options is Table.SelectRows.
Syntax
Table.SelectRows(
table as table,
condition as function
) as table
- Table: The table to be filtered
- Condition: A function which will be used to evaluate each row in the table
Example
Let’s say we have a column called Revenue and that, using the Number Filter sub-menu, we create a filter condition that Revenue must be greater than 250.
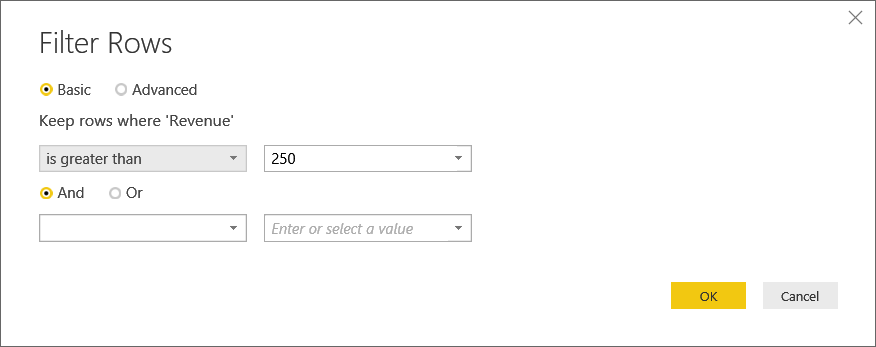
Let us also assume that in our code, a variable called Source contains a reference to our table, the resulting line of code would resemble the following:
#"Filtered Rows" = Table.SelectRows(
Source,
each [Revenue] > 250
)
Here, the Source variable supplies the Table argument; while the Condition argument is supplied by an inline function, consisting of the each keyword followed by the condition to be met.
As you can see, Power Query offers a good number of options for removing unwanted rows of data, both by using the interface and by writing M code.
